사용한 플랫폼 : Spring, Oracle
1. Cafe24 가입
정식 서비스가 아니기때문에 웹 용량은 최저용량인 Tomcat JSP 호스팅 절약형을 신청했다.
가입비는 2500원 서버 설치비 5000원까지 총 7500원의 요금이 발생했다.
서비스를 신청했다면 다음은 자신이 만든 프로젝트의 개발환경에 맞춰서 서버 환경을 설정 해 주어야 하는데, 나는 Tomcat 9.0, JDK 11, Oracle, Servlet 3.1.0, jsp 2.1 버전을 사용중이였다.
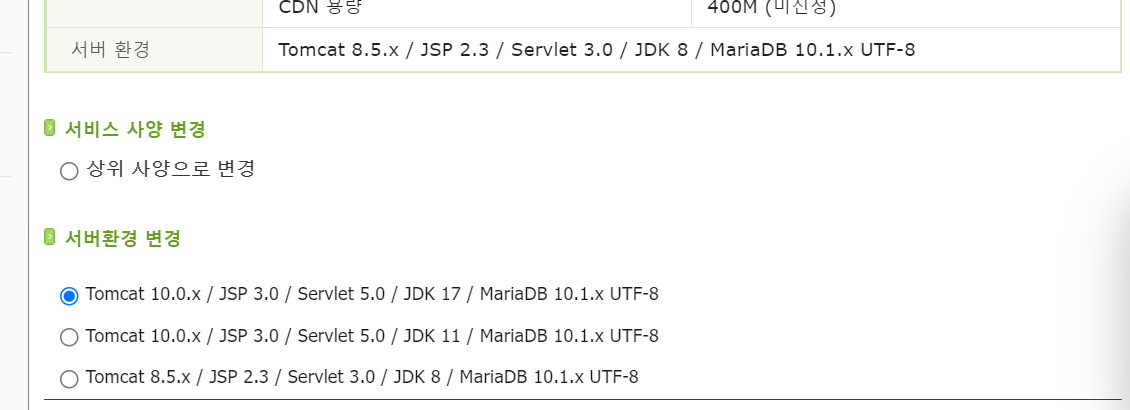
보다시피 Cafe24에는 내가 제작 프로젝트 개발환경과 틀리기 때문에 처음에는 단순히 JDK11 에 맞춰 서버환경을 변경하여 호스팅을 시도해봤지만 404 오류가 발생하였다.
개발환경부터 sql 쿼리문들과 DB를 MariaDB(Mysql)로 바꾸어야 하기때문에 처음부터 다시만들어야 하나… 싶었지만 하나하나 맞춰서 변경해보도록 했다.
일단 개발환경을 Cafe24의 서버 환경에 맞게 JDK 8버전을 설치 후 프로젝트의 속성에서 JDK 1.8로 바꾸어 주고 pom.xml 에서도 자바 버전을 맞추어 준다.
	<properties>
		<java-version>1.8</java-version>
		<org.springframework-version>5.2.8.RELEASE</org.springframework-version>
		<org.aspectj-version>1.6.10</org.aspectj-version>
		<org.slf4j-version>1.6.6</org.slf4j-version>
	</properties>


			<plugin>
				<groupId>org.apache.maven.plugins</groupId>
				<artifactId>maven-compiler-plugin</artifactId>
				<version>2.5.1</version>
				<configuration>
					<source>1.8</source>
					<target>1.8</target>
					<compilerArgument>-Xlint:all</compilerArgument>
					<showWarnings>true</showWarnings>
					<showDeprecation>true</showDeprecation>
				</configuration>
			</plugin>
이 두 부분의 버전을 맞춰주고 Mysql 서버를 이용하기 위해 Mysql 종속성을 추가해주었다.
<!-- https://mvnrepository.com/artifact/mysql/mysql-connector-java -->
<dependency>
    <groupId>mysql</groupId>
    <artifactId>mysql-connector-java</artifactId>
    <version>8.0.33</version>
</dependency>
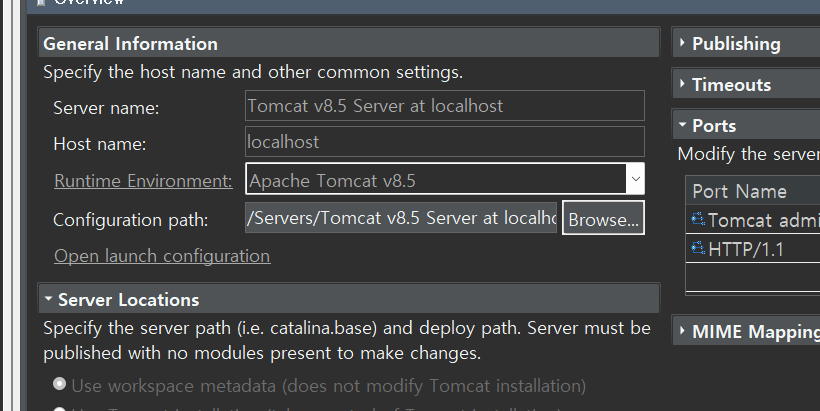
Tomcat도 마찬가지로 9.0 -> 8.5로 바꾸어 준다.
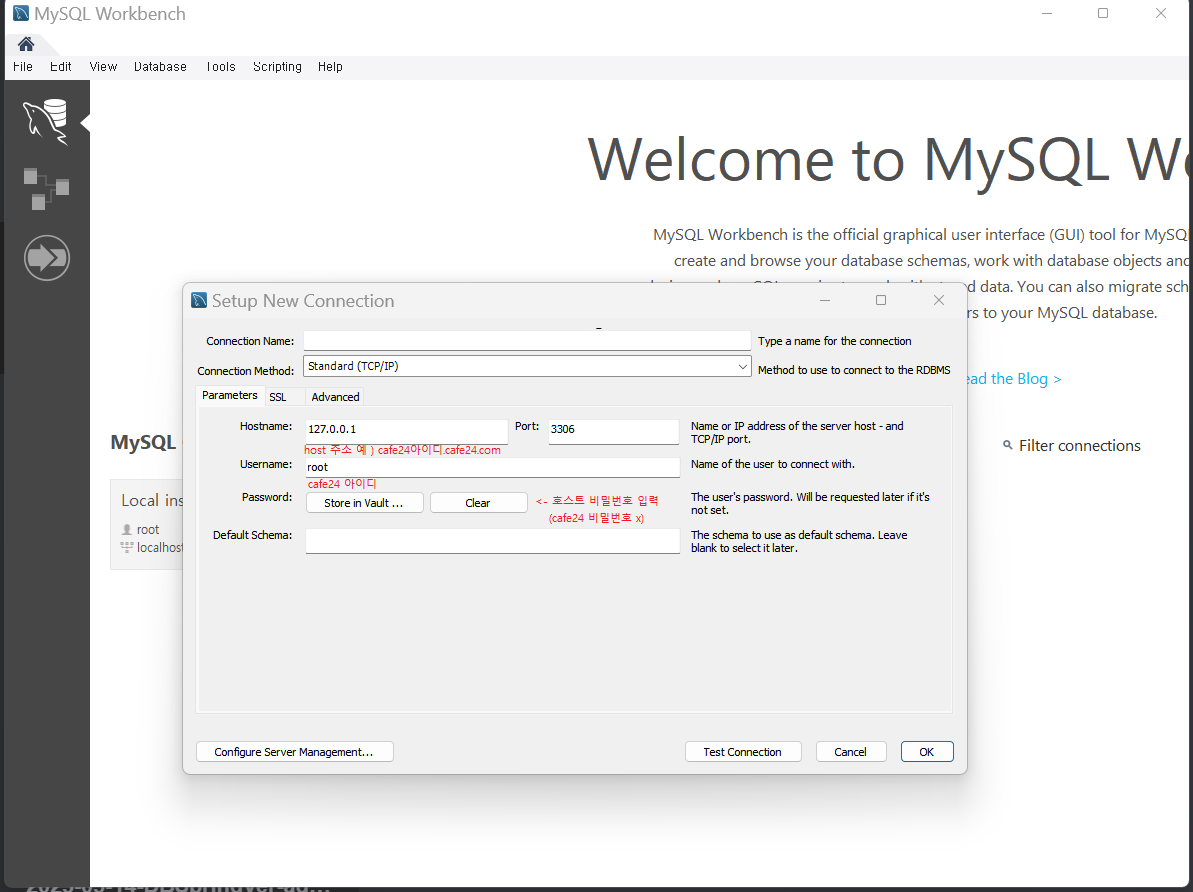
그리고 아래와 같이 Mysql에서 데이터베이스를 사용 할 수 있게 설정을 맞추어 준다.
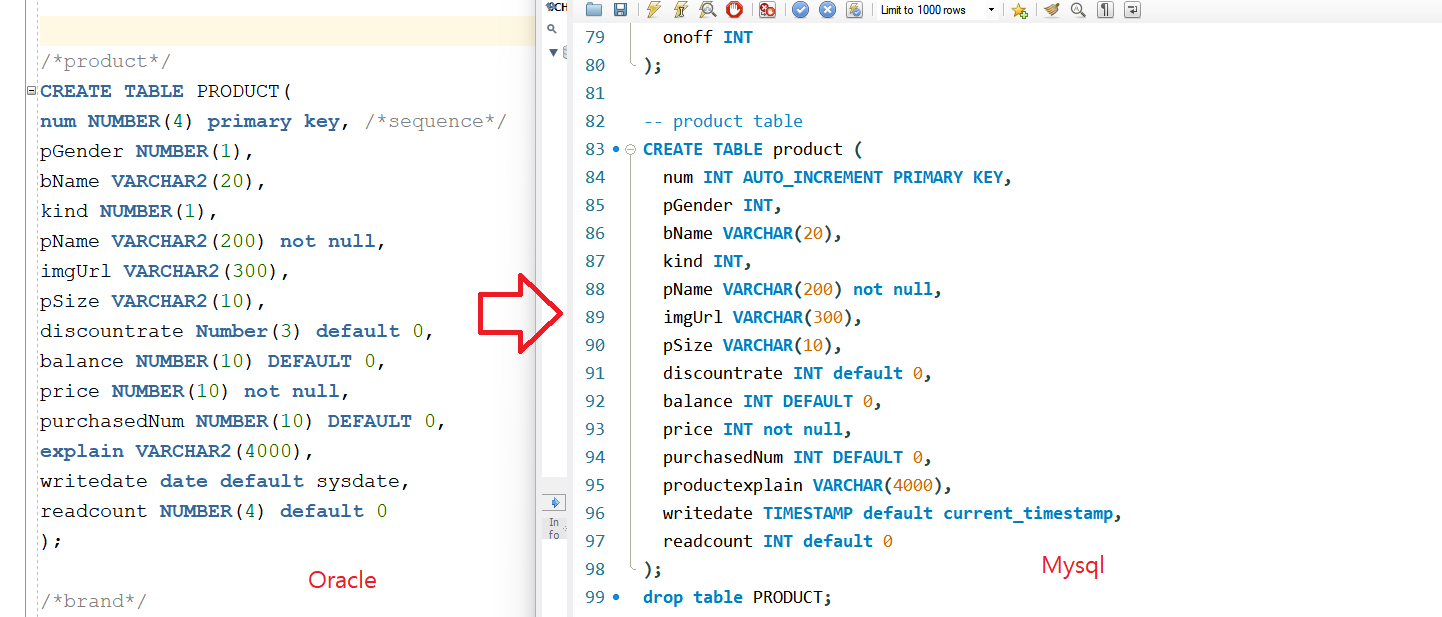
이제 SQL 문을 전부 바꾸어 줘야할 차례이다. 확인해보니 그리 바꿔야할 것이 많지 않았다. Oracle 에선 시퀀스를 임의로 생성하여 고유번호등을 증가되게 만들어야 하지만 Mysql은 auto_increment 로 Table을 생성시에 자동으로 증가 시켜준다.
그리고 날짜를 기록해주는 date 문들을 전부 timestamp로 바꾸어 주고 default 값을 current_timestamp 로 바꾸어 준다. date 문은 날짜와 시간을, timestamp는 정밀한 시간을 요구할 때 사용한다.
그리고 기존에 사용했던 product Table 에서는 상품 설명의 컬럼명을 explain 으로 지정해 두었었는데, mysql 에선 explain을 서버가 어떤 쿼리를 실행할 것인지, 즉 실행 계획이 무엇인지 알고 싶을때 사용하는 기본적인 명령어이기 때문에 productexplain으로 컬럼명을 바꾸어 주었다.(이 부분은 model에 ProductVO와 mapper.xml, view단에 기존 explain을 사용하던 부분을 전부 바꾸어 주어야 한다.) 아래는 바뀐 Table의 예시이다.
이제 Datebase에 접속을 하기위해 root-context.xml 을 수정 해준다.
<!-- mysql -->
<bean id="datasource"
class="org.springframework.jdbc.datasource.DriverManagerDataSource"
lazy-init="false">
<property name="driverClassName" value="com.mysql.cj.jdbc.Driver"/>
<property name="url"
value="jdbc:mysql://localhost/cafe24아이디?useUnicode=true&characterEncoding=utf8&useSSL=false&serverTimezone=UTC" />
<property name="username" value="cafe24아이디" />
<property name="password" value="호스트서버 비밀번호" />
</bean>
여기에서 로컬과 서버에 호스팅할때의 url이 다르기 때문에 잘확인하여 저장 후 배포하여야 한다.
로컬로 서버를 구동할땐 cafe24아이디.cafe24.com/cafe24아이디
호스팅 서버에 구동할땐 localhost/cafe24아이디
이런식으로 배포해야 한다.
이제 서버에 배포하기 위해 filezilla를 설치 후 접속, 사이트관리자 탭에서 아래와 같이 설정해준다.
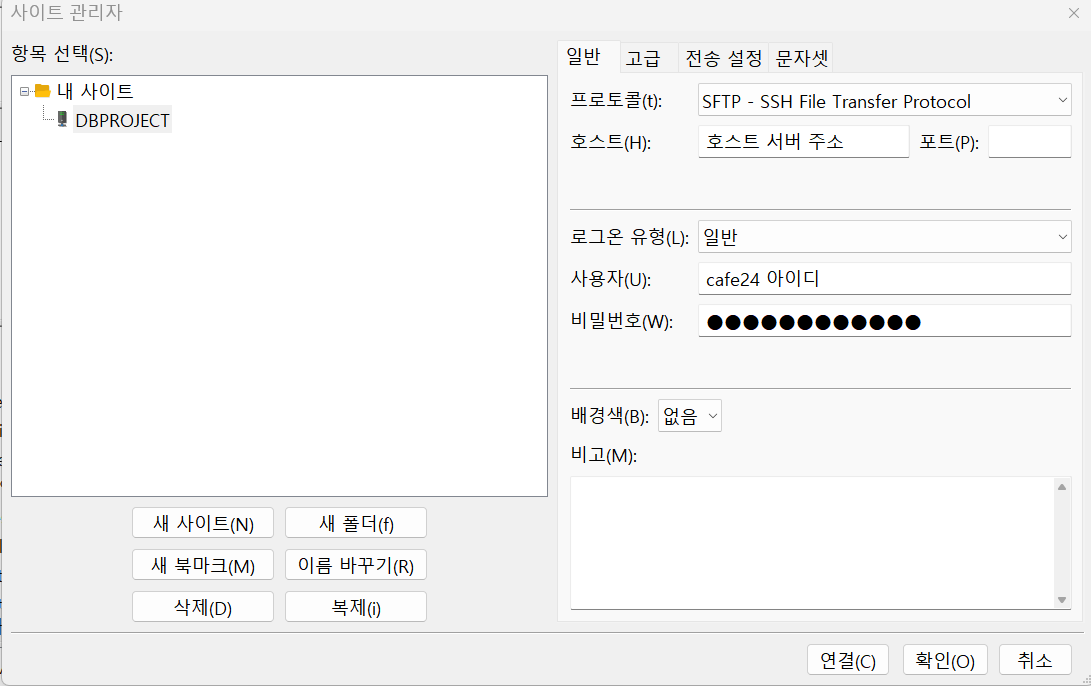
연결이 되면 리모트 사이트 밑에 경로를 cafe24아이디/tomcat/webapps 밑에 자신의 프로젝트를 WAR 파일로 배포하여 ROOT.war로 이름을 변경하여 올려준다.
이제 자신이 호스팅할 사이트의 Tomcat을 재구동 시켜주어야 한다. 이를 위해서 putty 를 설치 후 아래와 같은 창이 실행 되면
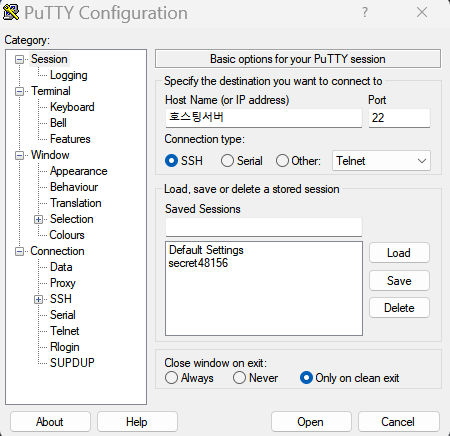
자신의 호스트 주소를 적고 연결을 한다.
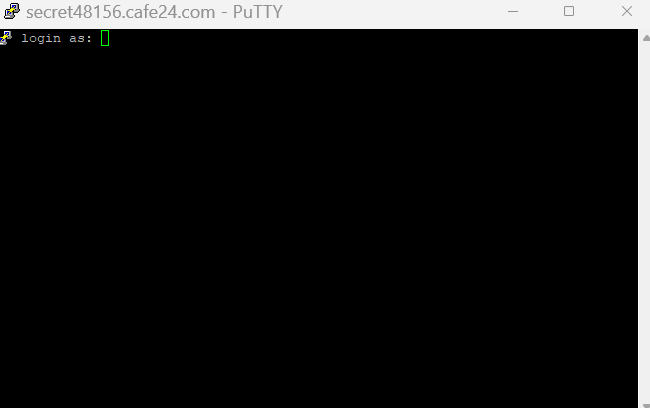
이런 화면이 뜨면 자신의 cafe24아이디를 입력 -> 호스트서버의 비밀번호를 입력 후
~/tomcat/bin/shutdown.sh 를 입력하여 톰캣서버를 중지 시키고, ~tomcat/bin/startup.sh 를 입력하여 다시 실행 시키면 호스팅 끝!
여기서 문제가 하나 발생 하는데 게시판이라던가 상품, 브랜드 등록 같은 기능들은 이미지가 업로드 될 때 절대경로가 자신의 폴더 경로로 업로드 되었기 때문에 이부분도 고쳐 주어야 한다.
web.xml 에서 업로드 관련한 절대 경로 위치를 바꾸어준다.
<multipart-config>
    <location>${catalina.home}/webapps/ROOT/resources/img/</location>
    <max-file-size>20971520</max-file-size>               <!-- 1MB * 20 -->
    <max-request-size>41943040</max-request-size>         <!-- 40MB -->
    <file-size-threshold>20971520</file-size-threshold>   <!-- 20MB -->
</multipart-config>
그리고 Controller에서 이미지가 업로드 되는 경로또한 같이 바꾸어 준다.
예) BoardController.java
	// 이미지 업로드
	@RequestMapping(value = "/imageUpload.do", method = RequestMethod.POST)
	public void imageUpload(HttpServletRequest request, HttpServletResponse response,
	        MultipartHttpServletRequest multiFile, @RequestParam MultipartFile upload) throws Exception {
	    // 랜덤 문자 생성
	    UUID uid = UUID.randomUUID();

	    OutputStream out = null;
	    PrintWriter printWriter = null;

	    // 인코딩
	    response.setCharacterEncoding("utf-8");
	    response.setContentType("text/html;charset=utf-8");
	    try {
	        // 파일 이름 가져오기
	        String fileName = upload.getOriginalFilename();
	        byte[] bytes = upload.getBytes();

	        // 이미지 경로 생성
	        String realPath = request.getRealPath("/resources/img/"); // 웹앱 경로 가져오기
	        String ckUploadPath = realPath + uid + "_" + fileName;
	        File folder = new File(realPath);
	        System.out.println("path:" + realPath); // 이미지 저장경로 console에 확인
	        // 해당 디렉토리 확인
	        if (!folder.exists()) {
	            try {
	                folder.mkdirs(); // 폴더 생성
	            } catch (Exception e) {
	                e.getStackTrace();
	            }
	        }

	        out = new FileOutputStream(new File(ckUploadPath));
	        out.write(bytes);
	        out.flush(); // outputStram에 저장된 데이터를 전송하고 초기화

	        String callback = request.getParameter("CKEditorFuncNum");
	        printWriter = response.getWriter();  // 서버에 요청
	        String fileUrl = "/board/ckImgSubmit.do?uid=" + uid + "&fileName=" + fileName; // 작성화면

	        // 업로드시 메시지 출력
	        printWriter.println("{\"filename\" : \"" + fileName + "\", \"uploaded\" : 1, \"url\":\"" + fileUrl + "\"}");
	        printWriter.flush();

	    } catch (IOException e) {
	        e.printStackTrace();
	    } finally {
	        try {
	            if (out != null) {
	                out.close();
	            }
	            if (printWriter != null) {
	                printWriter.close();
	            }
	        } catch (IOException e) {
	            e.printStackTrace();
	        }
	    }
	    return;
	}


	// 서버로 전송된 이미지 뿌려주기
	@RequestMapping(value = "/board/ckImgSubmit.do")
	public void ckSubmit(@RequestParam(value = "uid") String uid, @RequestParam(value = "fileName") String fileName,
	        HttpServletRequest request, HttpServletResponse response) throws ServletException, IOException {

	    // 서버에 저장된 이미지 경로
	    String realPath = request.getRealPath("/resources/img/"); // 웹앱 경로 가져오기
	    String sDirPath = realPath + uid + "_" + fileName;

	    File imgFile = new File(sDirPath);

	    // 사진 이미지 찾지 못하는 경우 예외처리로 빈 이미지 파일을 설정한다.
	    if (imgFile.isFile()) {
	        byte[] buf = new byte[1024];
	        int readByte = 0;
	        int length = 0;
	        byte[] imgBuf = null;

	        FileInputStream fileInputStream = null;
	        ByteArrayOutputStream outputStream = null;
	        ServletOutputStream out = null;

	        try {
	            fileInputStream = new FileInputStream(imgFile);
	            outputStream = new ByteArrayOutputStream();
	            out = response.getOutputStream();

	            while ((readByte = fileInputStream.read(buf)) != -1) {
	                outputStream.write(buf, 0, readByte);
	            }

	            imgBuf = outputStream.toByteArray();
	            length = imgBuf.length;
	            out.write(imgBuf, 0, length);
	            out.flush();

	        } catch (IOException e) {
	            e.printStackTrace();
	        } finally {
	            outputStream.close();
	            fileInputStream.close();
	            out.close();
	        }
	    }
	}
이렇게 까지 고쳐주었으면 다시 war파일로 배포 후 다시 서버를 구동 시키면 호스팅 완료! 모든 기능이 문제 없이 가동 되고 있음을 확인하였다.
그런데 여기서 끝내기는 조금 아쉬웠다. 호스팅 주소가 cafe24아이디.cafe24.com 으로 접속하는건 멋이 없지 않은가? 그래서 바로 도메인주소를 1년짜리로 구매하였다.
도메인 주소뒤에 붙는 .shop은 저렴했기 때문에 부담없이 구매하여 대표도메인 주소로 입력시키면 몇분뒤에 적용이된다.
http://dbgreenteapie.shop/
남들은 어떻게 보일 지 모르겠지만 감격스럽다.. 정말 내눈에 보이는. 다른 사람들도 볼 수 있는 내 손에서 태어난 나의 결과물이 탄생한 순간